* 본 내용은 충남대학교 조은선 교수님의 컴파일러 개론을 수강하고 작성한 글입니다.
1. enterIf_stmt
@Override public void enterIf_stmt(tinyPythonParser.If_stmtContext ctx) {
    if(visitedNodes.contains(ctx)){
        return;
    }
    visitedNodes.add(ctx);
    if(ctx.getChildCount()<=4){
        enterTest((tinyPythonParser.TestContext) ctx.getChild(1));//조건 계산 시작, 종료시 조건 if_x 까지 작성. 조건은 뒤집어져서 들어가므로 true일 시 작동할 코드를 바로 이어 쓴다.
        this.result+=(" IFEND"+(IfflowOrder2)+"\n");
        //분기하지 않았다면 true이므로 바로 할일 작성
        enterSuite((tinyPythonParser.SuiteContext) ctx.getChild(3));
        this.result+=("IFEND"+(IfflowOrder2)+":\n");
    }//if만 있을 때
    else {
        int i = 4;
        enterTest((tinyPythonParser.TestContext) ctx.getChild(1));//조건 계산 시작, 종료시 조건 if_x 까지 작성. 조건은 뒤집어져서 들어가므로 true일 시 작동할 코드를 바로 이어 쓴다.
        if(ctx.getChild(i).getText().equals("else"))
            this.result+=(" IFELSE"+IfflowOrder2+"\n");
        else
            this.result+=(" IFLABEL_"+(IfflowOrder2)+(IfflowOrder)+"\n");
        enterSuite((tinyPythonParser.SuiteContext) ctx.getChild(3));
        this.result+=("goto IFEND"+(IfflowOrder2)+"\n");
        while(ctx.getChild(i)!=null&&ctx.getChild(i).getText().equals("elif")){
            this.result+=("IFLABEL_"+IfflowOrder2+IfflowOrder+":\n");
            IfflowOrder+=1;
            enterTest((tinyPythonParser.TestContext) ctx.getChild(i+1));//조건 계산 시작, 종료시 조건 if_x 까지 작성. 조건은 뒤집어져서 들어가므로 true일 시 작동할 코드를 바로 이어 쓴다.
            if(ctx.getChild(i+4)!=null && ctx.getChild(i+4).getText().equals("else")){
                this.result+=(" IFELSE"+IfflowOrder2+"\n");
                enterSuite((tinyPythonParser.SuiteContext) ctx.getChild(i+3));
                this.result+=("goto IFEND"+IfflowOrder2+"\n");
            }//마지막 elif, else 있음.
            else if(ctx.getChild(i+4)==null){
                this.result+=(" IFEND"+IfflowOrder2+"\n");
                enterSuite((tinyPythonParser.SuiteContext) ctx.getChild(i+3));
            }//마지막 elif면서 else가 없음
            else {
                this.result+=(" IFLABEL_"+(IfflowOrder2)+(IfflowOrder)+"\n");
                enterSuite((tinyPythonParser.SuiteContext) ctx.getChild(i+3));
                this.result+=("goto IFEND"+IfflowOrder2+"\n");
            }
            i+=4;
        }//elif 처리
        if(ctx.getChild(i)!=null&&ctx.getChild(i).getText().equals("else")){
            this.result+=("IFELSE"+IfflowOrder2+":\n");
            enterSuite((tinyPythonParser.SuiteContext) ctx.getChild(i+2));
        }//else 처리
        this.result+=("IFEND"+IfflowOrder2+":\n");
    }//elif, else가 있을 때
    IfflowOrder=0;
    IfflowOrder2++;
}
// 연산에 필요한 것들을 load 해놓고 떠날 때 ifne나 ife 등 걸고 끝낸다.
enterIf_stmt는 코드의 길이를 보면 바로 짐작이 되겠지만 생각해줘야하는 요소가 조금 있다.
python에서 if문의 구조는
if (조건) :
body
elif (조건):
body
else:
body
의 형태를 띄고 있다. 여기서 if 이후에 elif는 0~n번까지 올 수 있고 else는 0~1번까지 올 수 있다.
이를 RegExp로 나타내보면, 'if' 조건 ':' body ('elif' 조건 ':' body)* ('else' ':' body)? 로 나타낼 수 있다.
그럼 구현을 시작해보겠다.
첫번째 고려할 점은 if문에 'elif가 있는가?' 와 '있다면 몇개나 있는가?', 'else는 있는가?' 이다.
elif의 존재여부는 간단히 ctx.getChildCount()를 통해 ctx tree의 child 갯수를 확인해보면 된다.
만약 child 갯수가 4개라면 if 문만 존재하는 것이다. 만약 아니라면 elif나 else가 적어도 1개 존재하는 것이므로
if_stmt ctx tree의 5번째 child부터 읽어나가며 elif일 시, else 일 시를 처리해준다.
두번째는 분기점의 label 명 표시이다.
나의 경우는 IFLABEL_(해당 소스코드의 if문 등장횟수)(해당 if문에서 몇번째 elif인지)의 형태로 elif label을 표시했고, IFELSE(해당 소스코드의 if문 등장횟수), IFEND(해당 소스코드의 if문 등장횟수)로 else, if문의 종료를 표시했다.
따라서 구현을 살펴보면
1. if문만 존재할시(ctx.getChildCount() <= 4)
if문의 구조를 그대로 따라서 enterTest(조건에 해당)를 해주고, 리턴된 조건에 따라서 IFEND로 분기하거나 body(enterSuite)를 실행한다. if문만 존재하므로 enterSuite가 종료되면 IFEND문으로 이동한다.
2. elif or else도 존재할 시
enterTest를 실행해 if문 검사를 한다, 만약 if문 조건에 부합하지 않았다면 다음 조건문(elif or else)로 이동하여야한다.
이 때, 다음 조건문이 else라면 IFELSE, 아닐시 IFLABEL을 써주어
goto 'enterTest의 결과' IFELSE(IFLABEL)을 result에 작성해준다.

이렇게 다음 child( ctx.getChild(i+4) )가 else거나 null일 때까지 elif를 스캔해가며 조건 검사, 조건 불만족시 goto IFLABEL
만족시 enterSuite 이후 goto IFEND를 반복하다가 ctx의 child를 전부 스캔했을 때, null이라면 else가 없는 것이므로 바로 IFEND를 작성한다. else가 스캔됐다면 IFELSE를 작성한 후 enterSuite 이후 IFEND를 작성해준다.
이 test.tpy 파일의 python 코드를
iload_0
bipush 3
if_icmplt IFLABEL_00
getstatic java/lang/System/out Ljava/io/PrintStream;
iload_0
invokevirtual java/io/PrintStream/println(I)V
goto IFEND0
IFLABEL_00:
iload_1
bipush 2
if_icmpge IFLABEL_01
getstatic java/lang/System/out Ljava/io/PrintStream;
iload_1
invokevirtual java/io/PrintStream/println(I)V
goto IFEND0
IFLABEL_01:
iload_1
bipush 3
if_icmple IFELSE0
getstatic java/lang/System/out Ljava/io/PrintStream;
bipush 3
invokevirtual java/io/PrintStream/println(I)V
goto IFEND0
IFELSE0:
getstatic java/lang/System/out Ljava/io/PrintStream;
iload_2
invokevirtual java/io/PrintStream/println(I)V
IFEND0:
위의 소스코드를 돌려 다음과 같이 jasmin으로 번역하였다.
jasmin으로 번역된 파일의 java decomplie 결과.
2. enterWhile_stmt
@Override public void enterWhile_stmt(tinyPythonParser.While_stmtContext ctx) {
    if(visitedNodes.contains(ctx)){
        return;
    }
    visitedNodes.add(ctx);
    this.result+=("Lloop"+WhileFlowOrder+":\n");
    enterTest((tinyPythonParser.TestContext) ctx.getChild(1));
    this.result+=(" Lend"+WhileFlowOrder+"\n");
    enterSuite((tinyPythonParser.SuiteContext) ctx.getChild(3));
    this.result+=("goto Lloop"+WhileFlowOrder+"\n");
    this.result+=("Lend"+WhileFlowOrder+":\n");
    this.WhileFlowOrder++;
}
/*
Loop 쓰고, 반복 조건 계산하고, 조건 불일치일시 end로 점프, 조건 일치일지 다시 Loop로.
enterTest는 조건을 뒤집어서 출력하므로, enterTest 조건이 만족 시, 반복을 끝내면 된다.
*/
enterWhile은 그래도 enterIf를 이해하고 본다면 비교적 간단하다. 단순히 Lloop(소스코드내에 등장한 while문 index)로 loop 지점을 표시해주고, enterTest를 통해 조건을 계산해준 뒤, 조건을 만족시킨다면 goto Lend(소스코드내에 등장한 while문 index)로 반복을 끝낸다. 만약 만족하지 못했을 시, enterSuite로 while문의 body를 실행해준 이후에, goto Lloop로 while문의 시작점으로 이동한다.
여기서 Jasmin 코드 상 jump 문은 goto로 쓰이는 것을 알 수 있고, 각 비교문의 표현은 다음과 같다.
switch (ctx.getChild(0).getText()){
    case ">":
        this.result+=("if_icmple");
        break;
    case "<":
        this.result+=("if_icmpge");
        break;
    case "==":
        this.result+=("if_icmpne");
        break;
    case ">=":
        this.result+=("if_icmplt");
        break;
    case "<=":
        this.result+=("if_icmpgt");
        break;
    case "!=":
        this.result+=("if_icmpeq");
        break;
}
따라서 enterTest 함수의 동작도 예측해볼 수 있는데, enterTest는 아마 조건으로 주어진 expression을 계산해 계산 결과 값이 Comp_op 조건에 부합하는 지를 판단해주게 작성을 해주면 될 것이다.
예를 들면 if(a>5+3) 일 시 enterTest로 들어오는 a>5+3에 대해
goto를 작성해주고, a를 load한 다음, 5+3을 계산하여 스택에 load 해둔다.
(ex: iload_0, bipush 5, bipush 3, iadd를 실행한다. 그 뒤 스택의 구조는 다음과 같이 되어있을 것이다.)
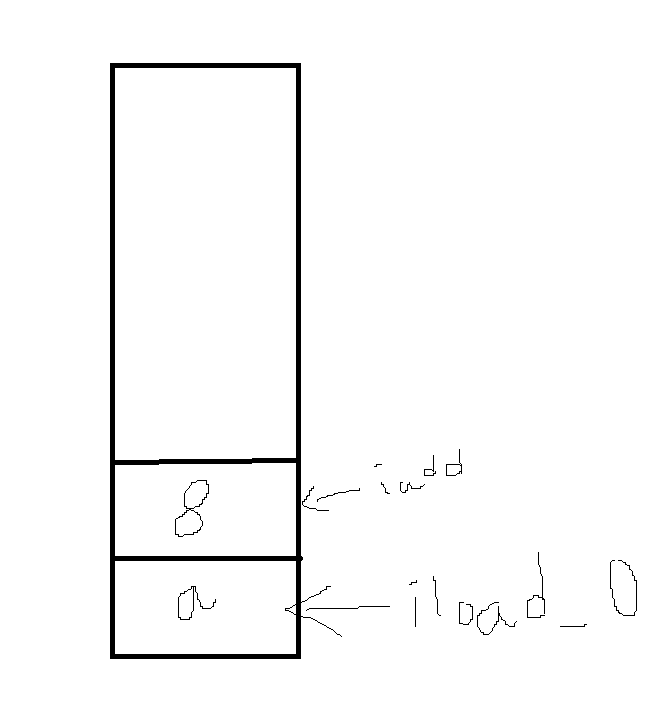
이후, >이 comp_op로 스캔되었으므로, "if_icmple"를 작성해주면 "<="인지를 검사하게 된다. 해당 값이 true면 자동으로 ">"은 false가 된다. 따라서 if_icmple (Label 이름) 이 작성되게 될 것이다.
여기서 enterTest의 역할은 입력된 조건을 계산해줘서 위의 사진의 스택을 만들어주고, 스캔된 compare op에 따른 비교 jump문을 작성해주는 것까지일 것이다. 그 뒤에 해당 jump문이 어디로 jump할 지는 enterIf나 enterWhile등 호출 함수에서 해줄 일이다.
'ANTLR를 이용한 JASMIN 컴파일러' 카테고리의 다른 글
| ANTLR를 이용한 tinyPython to Jasmin 컴파일러 만들기. - 7 (0) | 2024.01.09 |
|---|---|
| ANTLR를 이용한 tinyPython to Jasmin 컴파일러 만들기. - 6 (0) | 2024.01.08 |
| ANTLR를 이용한 tinyPython to Jasmin 컴파일러 만들기. - 4 (0) | 2024.01.03 |
| ANTLR를 이용한 tinyPython to Jasmin 컴파일러 만들기. - 3 (0) | 2023.12.29 |
| ANTLR를 이용한 tinyPython to Jasmin 컴파일러 만들기. - 2 (0) | 2023.12.28 |